Semaphore is actually more than just an Ansible GUI. It can also add Terraform, OpenTofu, and batch scripts. I will be moving my Ansible tasks over to Semaphore.
Installing Semaphore using Docker Compose
I’m not using LDAP, and will be using MySQL. This is pretty much straight from the Semaphore website.
Take note of the following:
- Remember to change your timezone.
- Refer to the semaphoreui docs for how to generate SEMAPHORE_ACCESS_KEY_ENCRYPTION
- https://docs.semaphoreui.com/administration-guide/installation#docker
- I am including the one they provide at the link above to get started.
services:
  mysql:
    restart: unless-stopped
    image: mysql:8.0
    hostname: mysql
    volumes:
      - semaphore-mysql:/var/lib/mysql
    environment:
      MYSQL_RANDOM_ROOT_PASSWORD: 'yes'
      MYSQL_DATABASE: semaphore
      MYSQL_USER: semaphore
      MYSQL_PASSWORD: ${MYSQL_PASSWORD}
  semaphore:
    restart: unless-stopped
    ports:
      - 3111:3000
    image: semaphoreui/semaphore:latest
    environment:
      SEMAPHORE_DB_USER: semaphore
      SEMAPHORE_DB_PASS: ${MYSQL_PASSWORD}
      SEMAPHORE_DB_HOST: mysql # for postgres, change to: postgres
      SEMAPHORE_DB_PORT: 3306 # change to 5432 for postgres
      SEMAPHORE_DB_DIALECT: mysql # for postgres, change to: postgres
      SEMAPHORE_DB: semaphore
      SEMAPHORE_PLAYBOOK_PATH: /tmp/semaphore/
      SEMAPHORE_ADMIN_PASSWORD: ${SEMAPHORE_ADMIN_PASSWORD}
      SEMAPHORE_ADMIN_NAME: admin
      SEMAPHORE_ADMIN_EMAIL: admin@localhost
      SEMAPHORE_ADMIN: admin
      SEMAPHORE_ACCESS_KEY_ENCRYPTION: ${SEMAPHORE_ACCESS_KEY_ENCRYPTION}
      SEMAPHORE_LDAP_ACTIVATED: 'no' # if you wish to use ldap, set to: 'yes'
      SEMAPHORE_LDAP_HOST: dc01.local.example.com
      SEMAPHORE_LDAP_PORT: '636'
      SEMAPHORE_LDAP_NEEDTLS: 'yes'
      SEMAPHORE_LDAP_DN_BIND: 'uid=bind_user,cn=users,cn=accounts,dc=local,dc=shiftsystems,dc=net'
      SEMAPHORE_LDAP_PASSWORD: 'ldap_bind_account_password'
      SEMAPHORE_LDAP_DN_SEARCH: 'dc=local,dc=example,dc=com'
      SEMAPHORE_LDAP_SEARCH_FILTER: "(\u0026(uid=%s)(memberOf=cn=ipausers,cn=groups,cn=accounts,dc=local,dc=example,dc=com))"
      TZ: UTC
    depends_on:
      - mysql # for postgres, change to: postgres
volumes:
  semaphore-mysql: # to use postgres, switch to: semaphore-postgres
Logging Into the Semaphore Web Interface
I exposed Semaphore on port 3111, so I will access it like this: http://192.168.1.109:3111/
I will use the password defined in this environment variable “${SEMAPHORE_ADMIN_PASSWORD}” as my admin password.
Getting Started
Ansible needs to log into your servers in order to execute the commands in the tasks. The easiest way is to create a user on each server and call it, for example “ansible_user” and give it a password. You can check out this page here for how to create the user. Check the “Authentication” section.
Authentication with an Ansible User
Setting up Semaphore
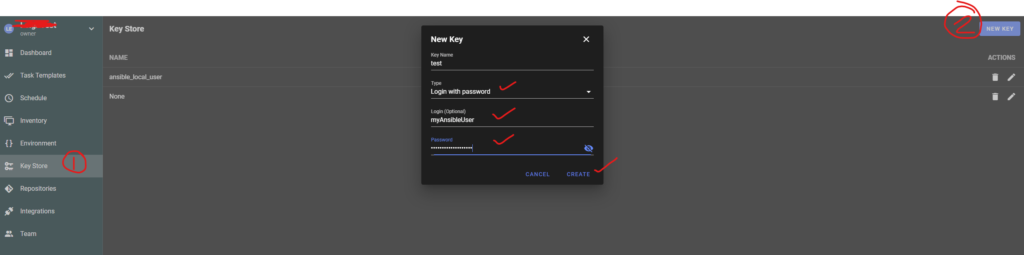
Keystore
Now add this ansible_user username and password to the Keystore
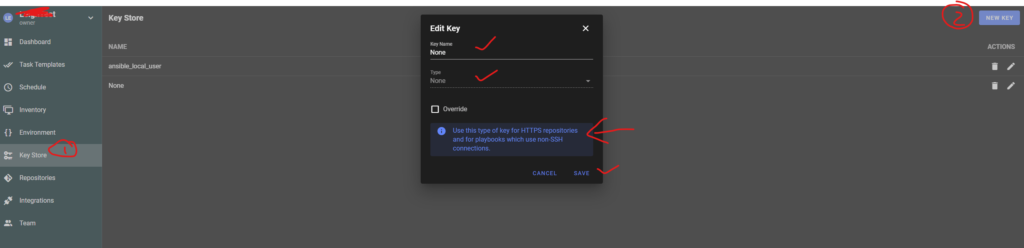
Next, add a “None” key in your keystore. This will be used by our Repository which we will set up next. Because our repo is public, we don’t need to provide it with any credentials, so we will just select this “None” key.
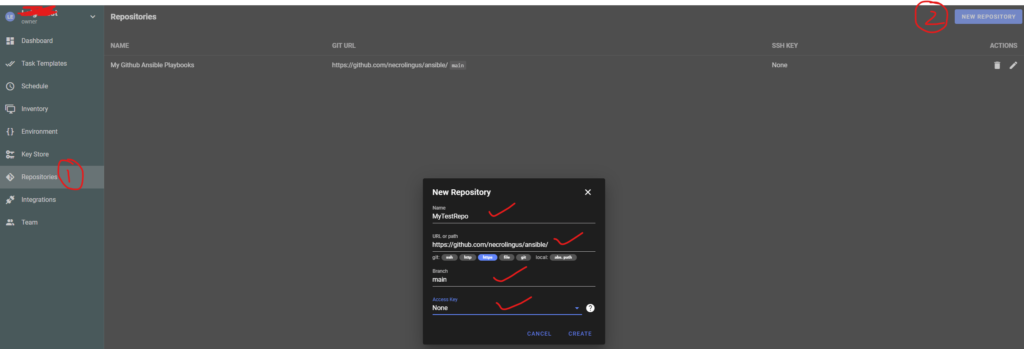
Repository
Your playbooks need to exist in a repository. The easiest way is to just create a public repository on Github. Mine is here: My Github Repository for all my Playbooks
Im using the “main” branch, so I just enter main for the branch
We will start with a simple “ping” playbook, just to test things out.
Add a playbook to your repository
Add a new file called “play_ping.yaml” with this code to your repository, and save it.
- name: Play Ping
  hosts: ubuntu_ct_testing
  become: yes
  tasks:
   - name: Ping my hosts
     ansible.builtin.ping:

   - name: Print message
     ansible.builtin.debug:
       msg: Ping all good!
Inventory
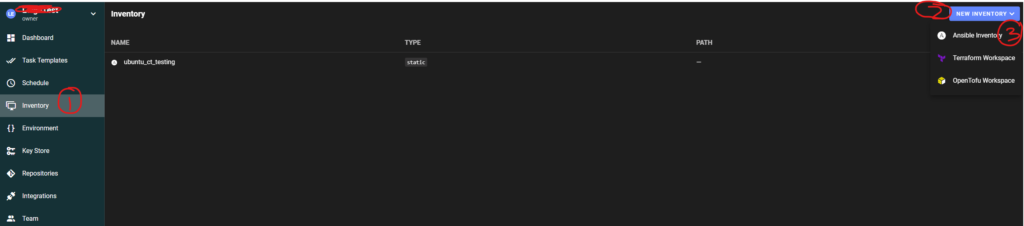
Next, we need to add a server, VM, LCX container, etc to run this playbook on. I have an Ubuntu LXC container I use for messing around, so I will add this container’s IP address.
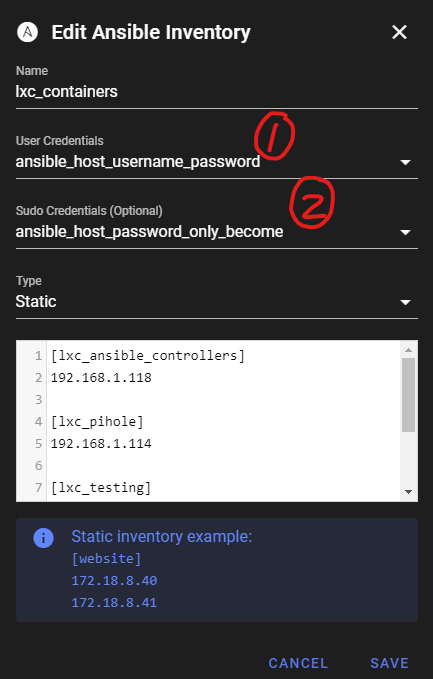
Select “Ansible Inventory” as in the below screenshot.
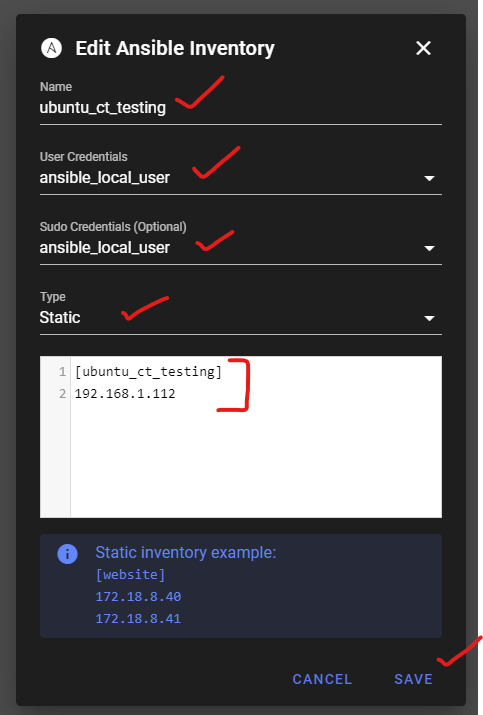
Now add your server IP address and use the Key we added earlier (the one containing the ansible user). We will use static inventory for now, but you can also use a file.
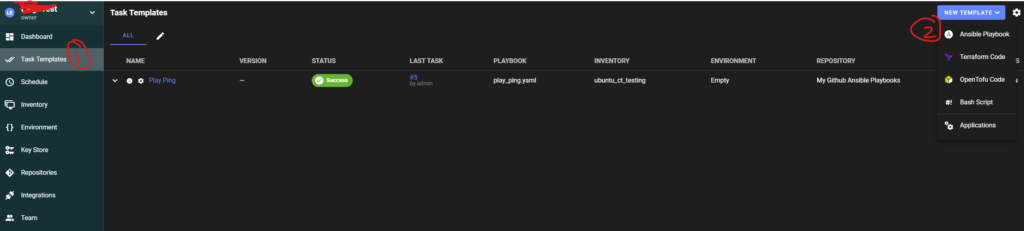
Task Template
Now lets add a task. Select “Ansible Playbook” as in the below screenshot.
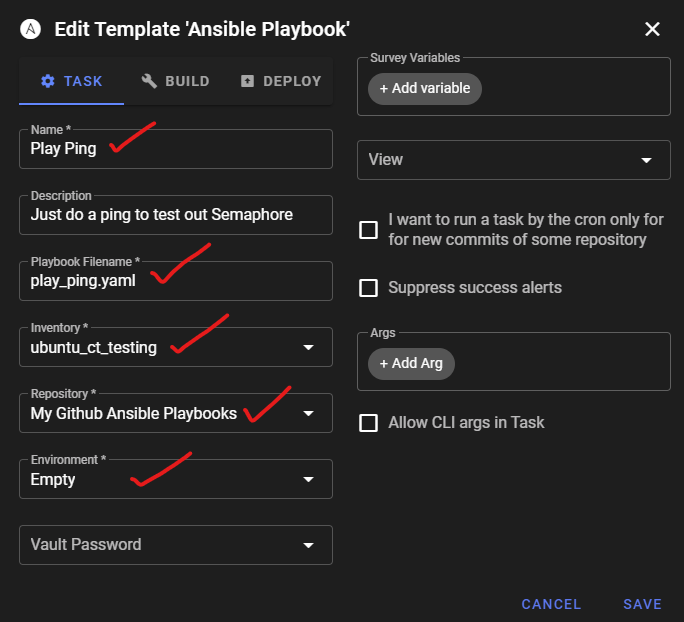
And enter the detail for your task:
- The playbook file name should be exactly as it is in your repo.
- Inventory is the inventory with the server we created just now.
- The repository is the one we added a while back.
- Environment can be empty for now.
Schedule
Next, we need to schedule our task template to run. The name of the template is the one you added above.
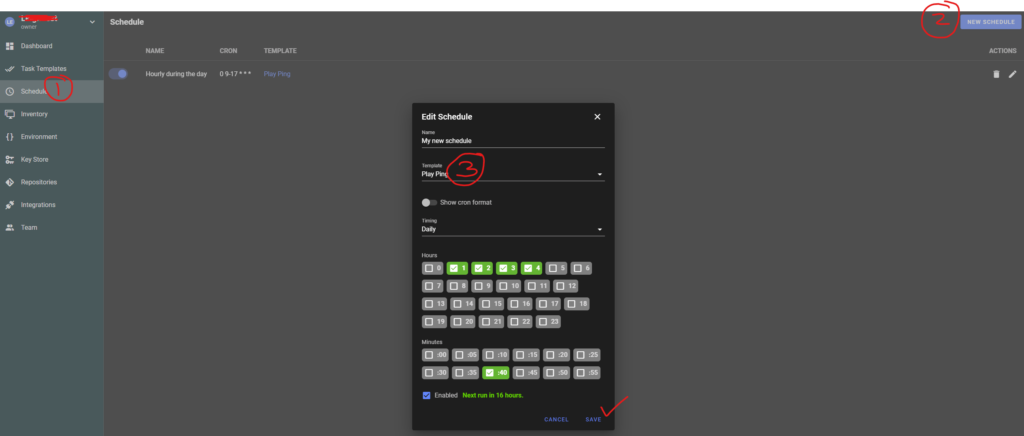
Schedule a task template
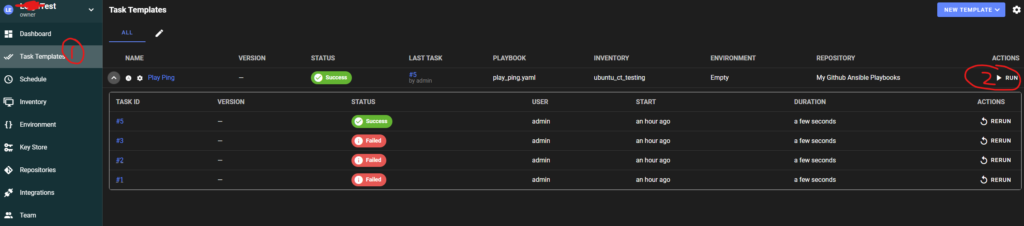
Your task template will run based on your schedule, or you can kick it off manually. Running it manually is a great way to test your playbook. Here is how you can do it:
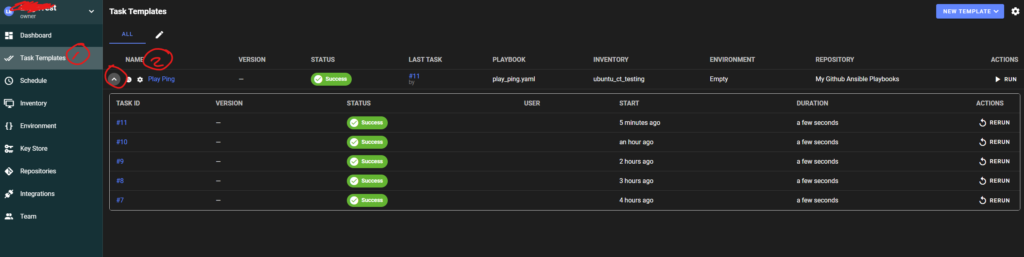
In your task templates, click on the Run button. You will see I already have some history.
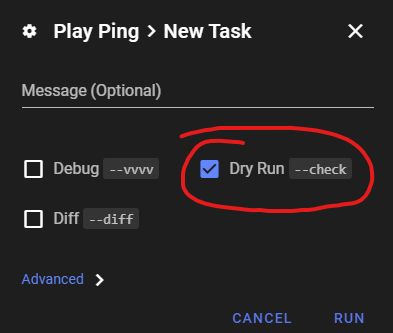
I like to do a dry run first so that everything can be validated. For example, if your repo is not reachable, you will get an error here.
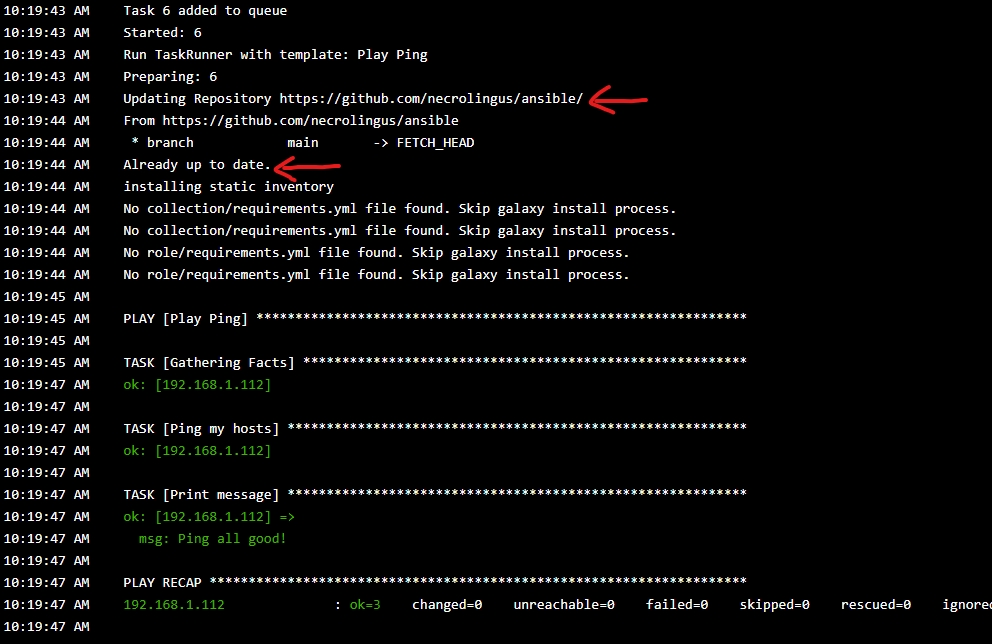
Here we can see it is pulling our repo and executing our playbook.
Now you can add your other servers and more playbooks and monitor runs from the web interface.
View task history
To view your task history, click on Task Templates and click the drop down arrow next to the task name. To see more then 5 entries, click on the Task name.
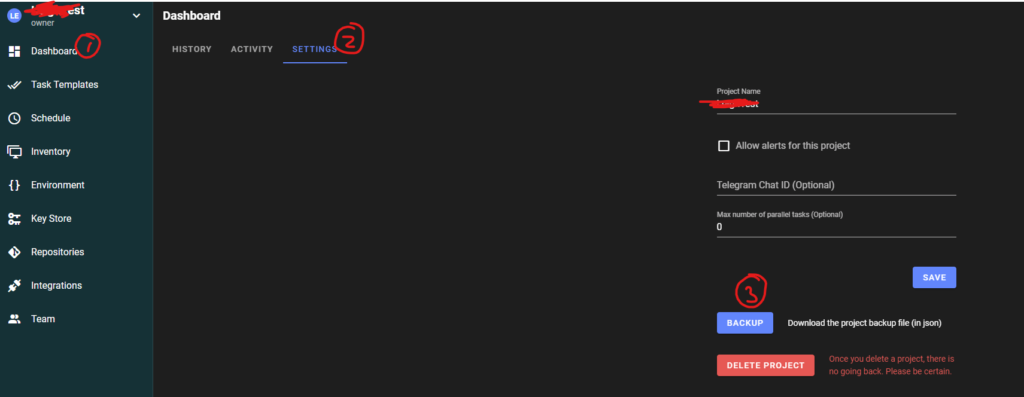
Backup your project
Click on Dashboard, then Settings.
How “become” works in Semaphore
Sometimes you need to use “become” in your playbook, as in this example:
- name: Clear lancache
hosts: virtual_machines_homeassistant
become: true
tasks:
- name: Remove all files in the cache directory
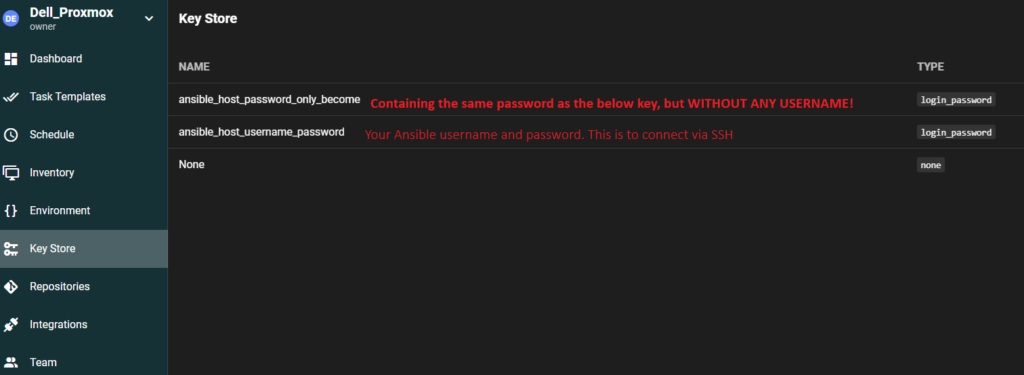
ansible.builtin.shell: rm -rf /opt/lancache/cache/cache/*But then you keep on getting “permission denied” errors. It is because Semaphore’s Keystore is not very self explanatory. You need to add 2 keys as per the below screenshot.
The first key must contain your ansible user’s username and password, the second key must contain ONLY the password, WITHOUT any username.
Then in your inventory, you must use the keys like this:
So 1 must contain the username and password. This is used for SSH.
The “Sudo Credentials” key must be the key that contains ONLY the password (the same password). If 2 contains a username as well, it looks like Semaphore will execute “su <user>” so when you use a username in that key, it will always just become that user, and never become root.