When running Home Assistant in docker, you do not get the supervisor capability which means you must install everything yourself. It is not a big deal because you just install it with docker and add the relevant integration in Home Assistant.
Here I will give a good getting started write-up which will install Home Assistant (also called Home Assistant Core in this instance), mosquitto, as well as Zigbee2MQTT. In Zigbee2MQTT we will also pass through a Sonoff Zigbee Dongle Plus for good measure.
I suggest using Portainer for this as it will make your life a lot easier. Keep in mind that Portainer calls docker-compose “stacks” but they are both the same thing.
Here is the full stack (docker-compose):
version: '3'
services:
  homeassistant:
    container_name: homeassistant
    image: "ghcr.io/home-assistant/home-assistant:stable"
    volumes:
      - /opt/homeassistant/config:/config
      - /etc/localtime:/etc/localtime:ro
    restart: unless-stopped
    privileged: true
    network_mode: host
  mosquitto:
    depends_on:
      - homeassistant
    container_name: mosquitto
    image: eclipse-mosquitto:latest
    volumes:
      - /opt/homeassistant/mosquitto/config:/mosquitto/config/
      - /opt/homeassistant/mosquitto/log:/mosquitto/log/
      - /opt/homeassistant/mosquitto/data:/mosquitto/data/
    ports:
      - 1883:1883
      - 9001:9001
    restart: unless-stopped
  zigbee2mqtt:
    container_name: zigbee2mqtt
    depends_on:
      - mosquitto
    image: koenkk/zigbee2mqtt
    volumes:
      - /opt/homeassistant/zigbee2mqtt/data:/app/data
      - /run/udev:/run/udev:ro
    ports:
      - 8080:8080
    devices:
      - /dev/serial/by-id/usb-ITead_Sonoff_Zigbee_3.0_USB_Dongle_Plus_7ee499da85c9eb119c4b8f4f1d69213e-if00-port0:/dev/ttyACM0
    restart: unless-stopped
    privileged: true
So how did we get to this stack?
Lets start with the basics first. (I assume you already installed docker, docker-compose, and already made it so you don’t have to issue sudo with every docker command. The latter is just to make your live easier)
I opted to use /opt/homeassistant/ as my main host folder where everything will be stored. This way everything is neatly contained in one place and I only have to back up 1 folder location.
Lets keep it simple: Start 1 container in the stack and build from there
Let’s start with mosquitto and get that configured properly. Here is the compose file we will use.
version: '3'
services:
  mosquitto:
    container_name: mosquitto
    image: eclipse-mosquitto:latest
    volumes:
      - /opt/homeassistant/mosquitto/config:/mosquitto/config/
      - /opt/homeassistant/mosquitto/log:/mosquitto/log/
      - /opt/homeassistant/mosquitto/data:/mosquitto/data/
    ports:
      - 1883:1883
      - 9001:9001
    restart: unless-stopped
Create the following config file for mosquitto and put it in your config location. Name the file mosquitto.conf
persistence true
persistence_location /mosquitto/data/
log_dest file /mosquitto/log/mosquitto.log
log_type all
listener 1883
allow_anonymous false
With the config file created, fire up your stack. Now click on the console button for the mosquitto container in portainer and select /bin/sh/
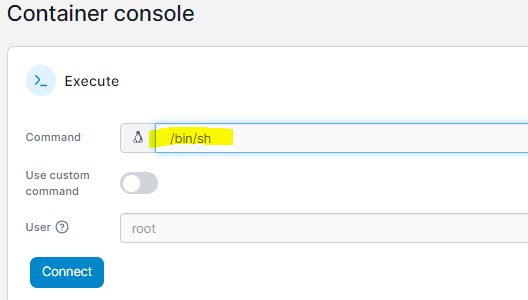
You will see a new file called “password.txt” in your config folder location. Now in your config file, add the line at the end:
persistence true
persistence_location /mosquitto/data/
log_dest file /mosquitto/log/mosquitto.log
log_type all
listener 1883
allow_anonymous false
password_file /mosquitto/config/password.txt
Restart your stack. Mosquitto is now done. You can download “MQTT Explorer” from here http://mqtt-explorer.com/ and connect to your MQTT instance. Your default port will be 1883 and the IP will be your docker host IP address.
Now lets move on to Zigbee2MQTT
This gets a big trickier as there is more to do, but the steps are outlined clearly.
Plug in your Sonoff Zigbee Dongle Plus. (Update its firmware using my other tutorial). Now run:
ls -l /dev/serial/by-id/You will get output such as this:

Zigbee2Mqtt recommends we use the by-id method of passing the dongle through the container, and not the tty method. This wat it stays the same no matter what happens to our USB ports.
Now test if the user you are running in Linux has access to this device using the below command (substitute USB0 with whatever your output gives you):
test -w /dev/ttyUSB0 && echo success || echo failureIf you get back “failure” do this:
Run “who” to determine what your currently logged in username is.
Then run these commands to add your user to the required groups:
- sudo usermod -a -G uucp USER
- sudo usermod -a -G tty USER
- sudo usermod -a -G dialout USER
Now restart your Linux device and run the same test command. You should get back “success”.
Now lets start up the stack (replace the by-id value under devices with your own):
version: '3'
services:
  zigbee2mqtt:
    container_name: zigbee2mqtt
    image: koenkk/zigbee2mqtt
    volumes:
      - /opt/homeassistant/zigbee2mqtt/data:/app/data
      - /run/udev:/run/udev:ro
    ports:
      - 8080:8080
    devices:
      - /dev/serial/by-id/usb-ITead_Sonoff_Zigbee_3.0_USB_Dongle_Plus_7ee499da85c9eb119c4b8f4f1d69213e-if00-port0:/dev/ttyACM0
    restart: unless-stopped
    privileged: true
The container startup will fail, but that is fine. The base config will get created which is what we are after for now. Go to your config location and make sure you have the following lines:
homeassistant: false
frontend: true
permit_join: true
mqtt:
  base_topic: zigbee2mqtt
  server: mqtt://192.168.18.37:1883
  user: YourUser
  password: YourPassword
serial:
  port: /dev/ttyACM0
Now start up the stack again, check its logs in portainer, and once it is started up go to <your linux host IP>: 8080
This will load the Zigbee2MQTT web interface. You won’t see any devices yet, but you can join a device or 2 and make sure it all works. The configuration file (and other relevant files) on the host will update as you add devices).
Time to fire up the entire stack
Now we can fire up the entire stack and do some Home Assistant config. First stop and delete the mosquitto and Zigbee2MQTT stacks and containers because we are adding them to all to one big stack now.
Go through the Home Assistant setup and once done, add the MQTT integration. You can use the username and password we created during our initial step.
Reference the config file below to add a more precise home zone, an iFrame for Zigbee2MQTT, as well as allow Cloudflare Zero Trust (or any other reverse proxy for that matter) to Home Assistant:
# Loads default set of integrations. Do not remove.
default_config:

#Added by me 2023-03-06 to allow CF Zero Trust to connect to HA which is hosted in Docker
http:
  use_x_forwarded_for: true
  trusted_proxies:
    - 0.0.0.0/0
  ip_ban_enabled: false
  login_attempts_threshold: 5

#Added by me 2023-03-06. Home will override the default Home zone
zone:
  - name: Home
    latitude: !secret zone_home_latitude
    longitude: !secret zone_home_longitude
    radius: 200
    icon: mdi:home-account

panel_iframe:
  router:
    title: "Zigbee2MQTT"
    url: "http://192.168.18.37:8080"
    icon: mdi:fridge


# Load frontend themes from the themes folder
frontend:
  themes: !include_dir_merge_named themes

# Text to speech
tts:
  - platform: google_translate

automation: !include automations.yaml
script: !include scripts.yaml
scene: !include scenes.yaml
In your Zigbee2MQTT config, you can now change this line to true homeassistant: true
2 Comments
OpenSSL on Windows and adding SSL Cert to Zigbee2MQTT - Techstuff · March 18, 2023 at 8:58 am
[…] This is an extention to my “Home Assistant on Docker” post which can be found here: https://techstuff.leighonline.net/2023/03/10/home-assistant-in-docker-home-assistant-core/ […]
ESPHome on Home Assistant running in Docker - Techstuff · March 19, 2023 at 9:04 am
[…] This is an extention to my “Home Assistant on Docker” post which can be found here: https://techstuff.leighonline.net/2023/03/10/home-assistant-in-docker-home-assistant-core/ […]
Comments are closed.