My Lenovo Legion Y540 BIOS corrupted due to the “Use iGPU” setting in the Lenovo Vantage software. Here are the steps I followed to reflash my BIOS.
Disclaimer
You are on your own when trying this and nobody, except yourself, is liable for any damages. I am not liable, a guy on Youtube is not liable, you are. You do this at your own risk.
Power
Disconnect your laptop charger, battery, and the CMOS battery. Then hold the power button for 30 seconds or so just to make sure all the caps are drained.
Connecting the clamp
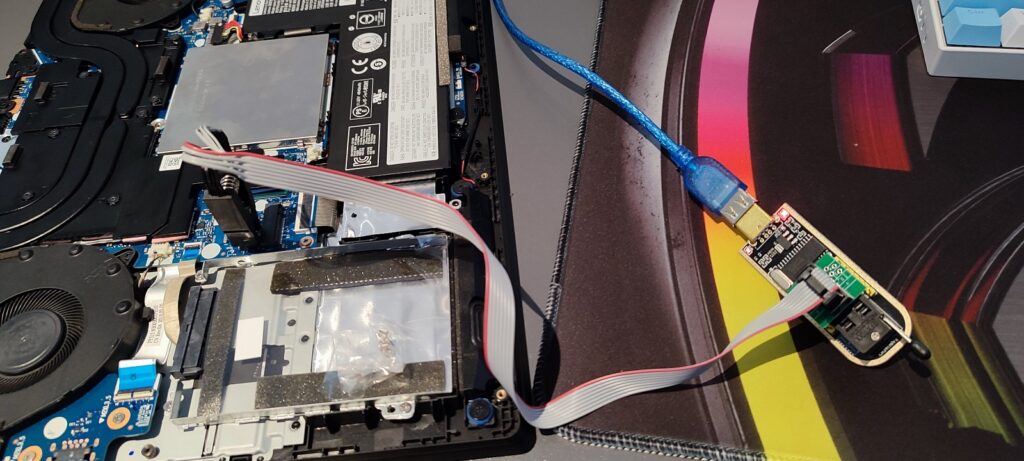
Make sure the cable with the red wire (on the clamp) is connected to the pin that has the little circle (looks like a tiny dot) on the BIOS chip. That little dot says it is pin 1.
On the CH431, make sure the red wire is pointing towards the lever. Check the images below.
Side note
I had hectic issues trying to get ASProgrammer to read my BIOS. It looks like the little clamp that goes onto the BIOS chip did not make proper contact. It was a 2 hour struggle. I moving wiggle the clamp a tiny bit, click the read button in ASProgrammer and repeat until it recognizes the BIOS.
When ASProgrammer was connected and making OK contact but not perfect contact, reading the BIOS would just give me 0x00000 for everything. When the clamp was not connected AT ALL, I would get FxFFFFF. So this difference told me that the clamp was doing something. After moving (very slightly) and reading the BIOS chip after each tiny movement, ASProgrammer gave me suggestions which told me the clamp was working properly.
After good contact, ASProgrammer did recognize a BIOS, but the suggested BIOSes were incorrect, so I just had to select my actual BIOS, no big deal.
The main tutorials I used
| URL | Notes |
|---|---|
| https://forums.lenovo.com/t5/Gaming-Laptops/Legion-Y740-no-boot-no-bios-no-logo-after-bios-backflash-to-1-08/m-p/5065455?page=3 | Main writeup used to create the below table |
| https://www.reddit.com/r/Lenovo/comments/nmv0u2/legion_y540_does_not_boot_bios_corrupted_need_help/ | The original site I found with a similar issue than mine. It links to a Youtube video that shows how to use the flasher |
Process and Tools I Used
| Tool | URL | Completed | Notes |
|---|---|---|---|
| ASProgrammer | https://github.com/nofeletru/UsbAsp-flash/releases | Y | This contains the drivers as well, so no need to get drivers separately. We will use this later on. |
| BIOS from Lenovo | https://download.lenovo.com/consumer/mobiles/bhcn45ww.exe | Y | Download the BIOS file as per usual |
| InnoExtract | https://constexpr.org/innoextract/ | Y | To extract the BIOS file. You just run “innoextract.exe c:\tmp\bhcn45ww_original.exe” Then you right click the EXE file and extract it using 7zip. It will create a folder with a bunch of files and inside that folder will be a .fd file in my case. Not .bin. Because my file is a .fd file, not a .bin file, go to the next row. |
| Insyde Extractor | https://github.com/LongSoft/InsydeImageExtractor/releases Check here for a good video on how to do this https://www.youtube.com/watch?v=aM6kjsdjXvw | Y | To convert the fd file to .bin extractor.exe c:\tmp\BIOS.fd c:\tmp\BIOS.bin The .bin file is also a bit smaller |
| HxD Hex Editor | https://mh-nexus.de/en/hxd/ | Y | Looks like the .BIN file from above is still a bit big at just over 16MB, so we will now trim it using HxD editor. Go to the edit menu and choose “Select Block”. Put “de9d0” in start-offset and “10de9cf” in end-offset and choose hex mode. Now hit enter. It will select the bios region. Now go to “Save Selection” in the File menu. Give it a name and .bin extension. We will use this file in our flash process. Flash with the BIOS.bin file first, as it is just over 16MB. And if this fails, then use BIOS_Selection.bin If everything still fails, use bios26_last_resort.bin that I got off of Reddit but this could be a bit dodge. *I ended up using BIOS.bin |
Here are some photos
You can see here that my clamp was a little bit skew, but that is the only way I could get it to make contact.
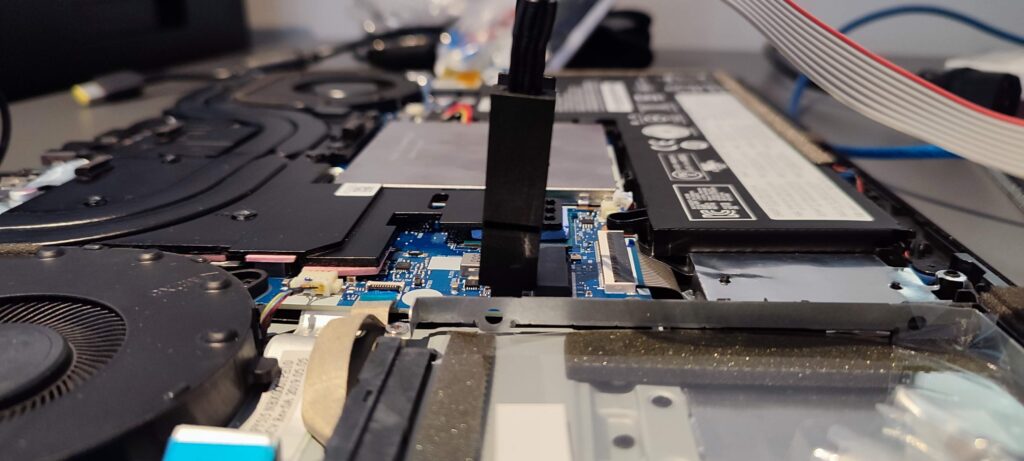
Here is my connection.