In this post we will diarize using pyannote, segment using pydub, and transcribe using whisper.
- huggingface is a library of machine learning models that user can share.
- Pyannote is an “open source toolkit for speaker diarization” (pyannote audio) but there is a lot more to it.
- pydub allows audio manipulation at a high level whish is super simple and easy to understand
- Whisper is a model build by OpenAI, the same company that built ChatGPT. It has an API but right now the open source and API versions are the same https://platform.openai.com/docs/models
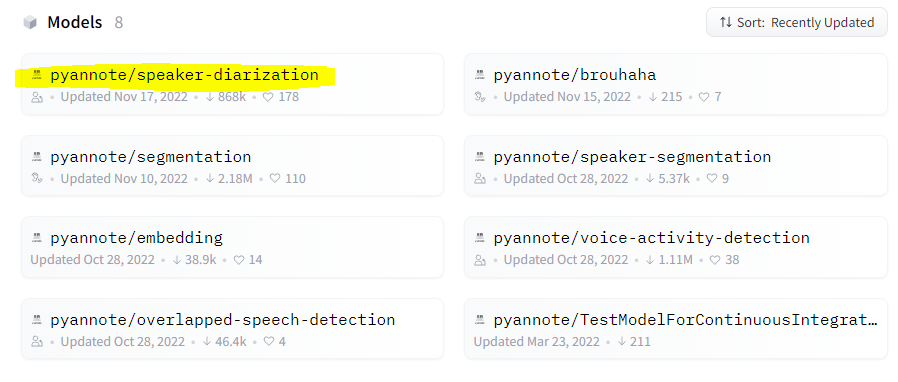
- You can find pyannote here: https://huggingface.co/pyannote and a lot more here https://github.com/pyannote For now though we will only use the diarization part.
- You can run all this in Google Colab so that you can use a GPU which will be much faster. For now I am running things locally.
Installing pyannote on Windows
- You will need Python. At the time of writing version < 3.11 so I am using Python 3.8.
- pip install pyannote.audio
- I got some errors about packages not being the correct version, but that didn’t cause any issues
- I also got an error that torchaudio was not installed. You can just install it with pip install torchaudio
While on https://huggingface.co/pyannote scroll down and click on the diariazation model for example code.
In the TLDR section, take note of these comments in the example code on the website. You must do this otherwise your code will not work:
# 1. visit hf.co/pyannote/speaker-diarization and accept user conditions
# 2. visit hf.co/pyannote/segmentation and accept user conditions
# 3. visit hf.co/settings/tokens to create an access token
# 4. instantiate pretrained speaker diarization pipeline
pyannote code
Run a terminal as administrator:
from pyannote.audio import Pipeline
pipeline = Pipeline.from_pretrained("pyannote/speaker-diarization", use_auth_token="xxxxxx")

# apply the pipeline to an audio file
diarization = pipeline("recording.wav")

# dump the diarization output to disk using RTTM format
with open("audio.rttm", "w") as rttm:
	diarization.write_rttm(rttm)

for turn, _, speaker in diarization.itertracks(yield_label=True):
    print(str(turn.start) + " -- " + str(turn.end) + " -- " + str(turn.duration)+ " -- " + str(turn.overlaps))
If you want to see all the variables in the “turn” object, you can use the following code (it works for pretty much all modules in Python):
 for item in dir(turn):
        if not item.startswith("__"):
            print(item)
I used a very basic audo track so my output will be basic

There is also an RTT file:
You can read more here https://stackoverflow.com/questions/30975084/rttm-file-format
Rich Transcription Time Marked (RTTM) files are space-delimited text files containing one turn per line, each line containing ten fields:
- Type — segment type; should always by SPEAKER
- File ID — file name; basename of the recording minus extension (e.g., rec1_a)
- Channel ID — channel (1-indexed) that turn is on; should always be 1
- Turn Onset — onset of turn in seconds from beginning of recording
- Turn Duration — duration of turn in seconds
- Orthography Field — should always by < NA >
- Speaker Type — should always be < NA >
- Speaker Name — name of speaker of turn; should be unique within scope of each file
- Confidence Score — system confidence (probability) that information is correct; should always be < NA >
- Signal Lookahead Time — should always be < NA >
If you know the number of speakers in advance:
diarization = pipeline("audio.wav", num_speakers=2)Lets use a more representative audio file
For my use case the audio file must be in mono and quite bad quality, so I downsampled quite a bit. This way I can check the accuracy and see if pyannote will be viable.
I pulled a random podcast from this site: https://www.openculture.com/great-podcasts
I split out the first 2 minutes of the file:
ffmpeg -ss 0 -t 120 -i random_audio_input.mp3 random_audio_output.mp3I then converted the audio file to mono with ffmpeg (but you can do more, see command below this one):
ffmpeg -i stereo.wav -ac 1 mono.wavDownsample the audio quality while changing this to mono, in one command:
ffmpeg -i random_audio_output.mp3 -ac 1 -ar 11025 -c:a libmp3lame -q:a 9 -b:a 96k random_audio_output_low.mp3- -q means quality (0 is the best, 9 is the lowest)
- -b means bitrate
- -ar means sampling rate
More information can be found here: https://trac.ffmpeg.org/wiki/AudioChannelManipulation
To strip out ID3 tags and album art, run this command:
ffmpeg -i random_audio_output_low.mp3 -map 0:a -c:a copy -map_metadata -1 random_audio_output_low_clean.mp3Then, after all this, I found out you cannot use mp3 files, so you can just split out the first 2 minutes then convert your file to WAV (and reduce the quality). No need to remove ID3 tags and all that.
ffmpeg -i random_audio_output_low_clean.mp3 random_audio_output.wavRun pyannotate again on this more representative file!
Quick manual file analyze
After analyzing the RTTM output and the audio file, I found that everything seemed accurate. pyannote identified 3 speakers and there are in fact 3 speakers. The times when the speakers talk are also accurate. So looks like we’re all good even with a low quality audio file.
Segmenting Audio (using pydub) and the pyannotate RTTM output
Now that we have the start times + duration (which we will convert to start + end shortly) in our RTTM file, we need to use this information and create nice looking segments. For this we will use pydub and we will create a new audio file with a 1 second silence pause between these start + end times.
- You can install ffmpeg with python, but if you already have it somewhere, point pydub to it.
- We read in our original file and split it on our start + end durations
- Then we create an empty AudioSegment object and append these times + the silence to it
- Then we write our a text file with the start+end+speaker data
from pydub import AudioSegment
AudioSegment.converter = 'C:\\Users\\leigh\\Downloads\\ffmpeg\\bin\\ffmpeg.exe'

#some silence. Not really needed but add it to create some space between the segments
silence_duration = 1000
some_silence = AudioSegment.silent(duration=silence_duration)

#my audio file from file
my_audio = AudioSegment.from_wav("random_audio_output.wav")

#an empty segemnt for new audio
empty = AudioSegment.empty()

orig_seg_list = []
new_seg_list = []

#read the RTTM file and process the contents
with open('audio.rttm') as f:
    lines = f.readlines()

for line in lines:
    line = line.replace('\r','').replace('\n','')
    line_arr = line.split(' ')

    #create variables we will need
    seg_start = int(line_arr[3].replace('.',''))
    seg_duration = int(line_arr[4].replace('.',''))
    seg_speaker = line_arr[7]
    seg_end = seg_start + seg_duration

    empty = empty.append(my_audio[seg_start:seg_end], crossfade=0)
    empty = empty.append(some_silence, crossfade=0)

    #prepare the text we will write to the original segmented start and end
    full_string = (str(seg_start) + ";" + str(seg_end)  + ";" + str(seg_duration) + ";" + str(seg_speaker) + "\n")
    orig_seg_list.append(full_string)

empty.export("segmented.wav", format="wav")
with open('original_segments.txt', 'w') as f:
    f.writelines(orig_seg_list)
Here is where some foresight comes in. Whisper does not translate up to a silence or something like that, it transcribes in whatever chunks it wants. So, to match back whisper’s start and end times to our segmented start and end times for each speaker produced in the above code will be a mission and not super accurate.
Therefore, here is some code that creates files for each speaker with small audio segments on which we can run whisper. This way we have the speaker, a bunch of files where that speaker talked, as well as the matching transcription. Way more accurate in my opinion. If there are overlapping speakers this might have to change as I don’t know what the RTTM file will look like for this scenario.
There are some sites doing the start+end time matching thing, but I don’t know how accurate that will be. You can read more about it here:
- https://lablab.ai/t/whisper-transcription-and-speaker-identification
- https://github.com/openai/whisper/discussions/264
from pydub import AudioSegment
AudioSegment.converter = 'C:\\Users\\leigh\\Downloads\\ffmpeg\\bin\\ffmpeg.exe'
#some silence. Not really needed but add it to create some space between the segments
silence_duration = 1000
some_silence = AudioSegment.silent(duration=silence_duration)
#my audio file from file
my_original_audio = AudioSegment.from_wav("random_audio_output.wav")
#read the RTTM file and process the contents
with open('audio.rttm') as f:
lines = f.readlines()
for line in lines:
line = line.replace('\r','').replace('\n','')
line_arr = line.split(' ')
#create variables we will need
seg_start = int(line_arr[3].replace('.',''))
seg_duration = int(line_arr[4].replace('.',''))
seg_speaker = line_arr[7]
seg_end = seg_start + seg_duration
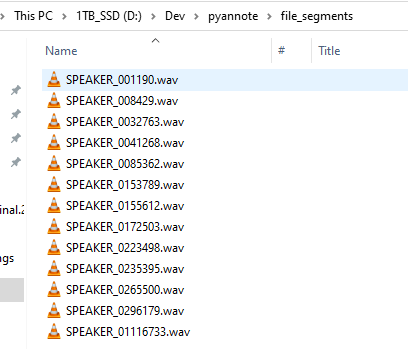
audio_segment_file_name = "file_segments\\" + seg_speaker + str(seg_start) + ".wav"
#an empty segemnt for new audio. The silence probably not necessary but lets add it for now
empty = AudioSegment.empty()
empty = empty.append(some_silence, crossfade=0)
empty = empty.append(my_original_audio[seg_start:seg_end], crossfade=0)
empty = empty.append(some_silence, crossfade=0)
empty.export(audio_segment_file_name, format="wav")The output will look like this:
Transcribe the audio using the Whisper API
- Whisper Github: https://github.com/openai/whisper
- Whisper Model Cards (for choosing a model): https://github.com/openai/whisper/blob/main/model-card.md
- Model information: https://huggingface.co/docs/transformers/model_doc/whisper
- Parameter tuning: https://blog.deepgram.com/exploring-whisper/
- Advanced usage: https://www.assemblyai.com/blog/how-to-run-openais-whisper-speech-recognition-model/
Lets create a new virtual environment first and activate it
python -m venv d:\dev\python_venv_whisper
cd D:\Dev\python_whisper_venv\Scripts
activate
Whisper has a few dependencies. You can install all the dependencies and whisper with this command:
pip install git+https://github.com/openai/whisper.gitTo update the package you can run
pip install --upgrade --no-deps --force-reinstall git+https://github.com/openai/whisper.gitYou might get some errors during the install but that’s OK, we will fix it as we progress.
Run the model
You can either run whisper on the command line or from python. Read the github readme to see how. We will use the command line for now.
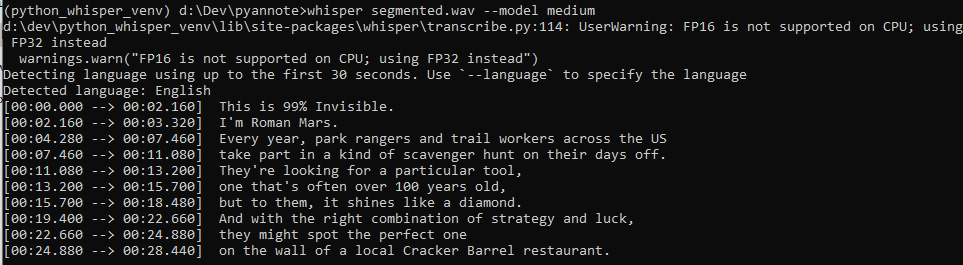
You can run whisper like this (while in your venv):
whisper segmented.wav --model mediumIf you get this error “initialization of _internal failed without raising an exception” or a “numba” error you can fix it with this (there seems to be a numba and numpy version issue):
pip uninstall numpy
pip uninstall numba
pip install numba
When you run whisper for the first time it will download the model.

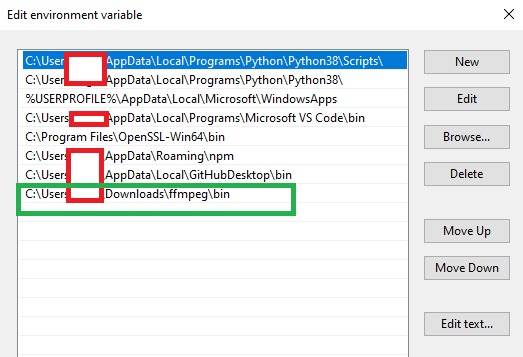
If you get an error about “file not specified” or “file not found” make sure your venv can find FFMpeg. it should’ve been installed when you ran the pip install git command up top so close your cmd prompt window, open it again, and activate your venv and run the whisper command again. If that doesn’t work, download ffmpeg and add its “bin” directory into your environment variables.
While the model is transcribing you will get the following output. When running on your CPU it will take quite a while. It will be much faster on a GPU.
When the transcription is done, whisper will create a bunch of files in the same directory you ran it from. The file names will be the same name as the audio file.
We have the same issue I described above:
How do you match the start + end times output by whisper back to the start + end times in your RTTM file? So here is some code to run whisper on all the smaller files so we can get the transcription for each segment and use the whisper output to get only that small file’s transcription.
import whisper
import os
import json

model = whisper.load_model("medium")
audio_file_dir = 'D:\\Dev\\pyannote\\file_segments\\'

all_files = os.listdir(audio_file_dir)
for a in all_files:
    full_path = audio_file_dir + a
    result = model.transcribe(full_path)

    #print the data
    print(full_path)
    print(json.dumps(result, indent=4))
    print('---'*10)
The output will be JSON. Here is an example:
You can iterate over the segments object to get your text. Much simpler than trying to match back start + end times.
D:\Dev\pyannote\file_segments\SPEAKER_0085362.wav
{
    "text": " Dolly is an expert at finding, using and maintaining these coveted saws. And she's got a matchmaking reputation. People call her up to get paired with their perfect crosscut.",
    "segments": [
        {
            "id": 0,
            "seek": 0,
            "start": 0.0,
            "end": 5.9,
            "text": " Dolly is an expert at finding, using and maintaining these coveted saws.",
            "tokens": [
                50364,
                1144,
                13020,
                307,
                364,
                5844,
                412,
                5006,
                11,
                1228,
                293,
                14916,
                613,
                48497,
                292,
                1866,
                82,
                13,
                50659
            ],
            "temperature": 0.0,
            "avg_logprob": -0.2216084107108738,
            "compression_ratio": 1.2794117647058822,
            "no_speech_prob": 0.17507809400558472
        },
        {
            "id": 1,
            "seek": 0,
            "start": 5.9,
            "end": 8.24,
            "text": " And she's got a matchmaking reputation.",
            "tokens": [
                50659,
                400,
                750,
                311,
                658,
                257,
                2995,
                12402,
                13061,
                13,
                50776
            ],
            "temperature": 0.0,
            "avg_logprob": -0.2216084107108738,
            "compression_ratio": 1.2794117647058822,
            "no_speech_prob": 0.17507809400558472
        }
    ],
    "language": "en"
}
Here is a more advanced example: (using the base dataset which is just as good as medium, for English text)
import whisper
import os
import json

model = whisper.load_model("base.en")
audio_file_dir = 'D:\\Dev\\pyannote\\file_segments\\'

all_files = os.listdir(audio_file_dir)
for a in all_files:
    full_path = audio_file_dir + a

    audio = whisper.load_audio(full_path)
    #Pads or trims your audio file to the specified duration. The default size is 30 seconds
    audio = whisper.pad_or_trim(audio)
    # make log-Mel spectrogram and move to the same device as the model
    mel = whisper.log_mel_spectrogram(audio).to(model.device)
    #some custom options
    options = whisper.DecodingOptions(language="en", fp16 = False)
    result = whisper.decode(model, mel, options)
    #result = model.transcribe(full_path)

    print(full_path)
    print(result.text)
    print("----"*10)
Overlapping speech
You can get some overlapping speech samples here: https://www.scientificamerican.com/article/speech-getting-computers-understand-overlapping/
from pyannote.audio import Pipeline
pipeline = Pipeline.from_pretrained("pyannote/overlapped-speech-detection", use_auth_token="xxxxxx")
output = pipeline("segmented.wav")
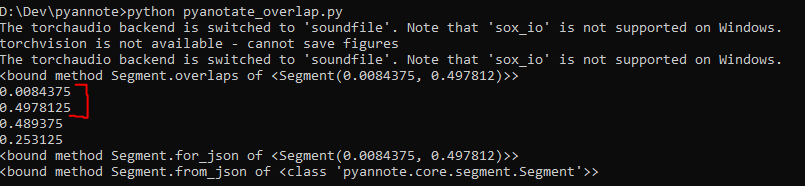
for speech in output.get_timeline().support():
print(speech.overlaps)
print(speech.start)
print(speech.end)
print(speech.duration)
print(speech.middle)
print(speech.for_json)
print(speech.from_json)The output will consist of the audio segments that contains overlapping speech in the form of the start, end, and duration of the overlapping speech in the audio file.
The RTTM file will look the same as for diarization:
