There doesn’t seem to be a single, simple, straight forward tutorial online that shows how to get Lancache working with Pihole.
These are the URLs that I referenced to get this working, so just listing them here in case you want to read more, but I will explain everything.
| URL | Purpose |
|---|---|
| https://github.com/lancachenet/docker-compose | Official Github page for Lancache |
| https://lancache.net/ | Lancahe website |
| https://dannyda.com/2020/06/22/how-to-use-lancache-with-portainer-openmediavault-5-omv5-and-pfsense-unbound-how-to-install-lancache-with-portainer-how-to-use-lancache-with-existing-dns-server/ | Very helpful site |
| https://discourse.pi-hole.net/t/dns-redirect-to-lancache/66568/3 | Another very helpful site |
Domains to cache
To see what domains you should (and can) cache, check out this awesome Github repo. Each txt file contains the domains for the various game servers, Windows updates, etc. Be sure to check their lists every so often for any updates.
The reason we should check this list is because we will set up DNSMasq rules, so once in a while just make sure you are forwarding everything (more on this later).
https://github.com/uklans/cache-domains (There probably are other sources, but this one is pretty cool)
Docker Compose for Lancache
We need to host Lancache as a docker container. I will explain what you should change down below:
Take Note: I am using Portainer, hence “the “env_file: stack.env“
Docker Compose File
version: '2'
services:
  dns:
    image: lancachenet/lancache-dns:latest
    restart: unless-stopped
    env_file: stack.env
    ports:
      - ${DNS_BIND_IP}:53:53/udp
      - ${DNS_BIND_IP}:53:53/tcp


  monolithic:
    image: lancachenet/monolithic:latest
    restart: unless-stopped
    env_file: stack.env
    ports:
      - 80:80/tcp
      - 443:443/tcp
    volumes:
      - ${CACHE_ROOT}/cache:/data/cache
      - ${CACHE_ROOT}/logs:/data/logs
And here is my .env file I uploaded into Portainer for this stack
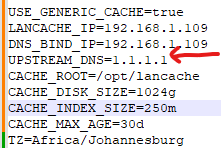
USE_GENERIC_CACHE=true
LANCACHE_IP=192.168.1.109
DNS_BIND_IP=192.168.1.109
UPSTREAM_DNS=1.1.1.1
CACHE_ROOT=/opt/lancache
CACHE_DISK_SIZE=1024g
CACHE_INDEX_SIZE=250m
CACHE_MAX_AGE=30d
TZ=Africa/Johannesburg
You have to change the following for your environment
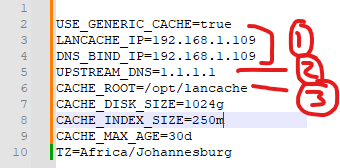
- This should be the IP address of the host that your Lancache is running on. We will forward DNS queries for Windows Updates and game servers from Pihole to this host IP (192.168.1.109), which in turn will pass it to this container on port 53.
- This tells Lancache what upstream DNS provider to use to resolve the hostnames. We probably can point it back to Pihole, but we might end up creating a resolver loop.
- Change this to where you want your Lancache container to cache files on the host machine
Take Note: In your docker compose file, do NOT change port 80 and 443. If they are already in use on your host, make a plan, because Lancache MUST liseten on these 2 ports.
We can now start this stack on Portainer.
Creating the dnsmasq config file
I am going to use the Windows updates file from that UKLans repo I talked about above. https://github.com/uklans/cache-domains/blob/master/windowsupdates.txt
Now we just need to put it in dnsmasq format
For each line in that URL above, we will create a dnsmasq line that looks like this:
server=/windowsupdate.com/192.168.1.109
server=/dl.delivery.mp.microsoft.com/192.168.1.109
server=/update.microsoft.com/192.168.1.109
server=/do.dsp.mp.microsoft.com/192.168.1.109
server=/microsoft.com.edgesuite.net/192.168.1.109
server=/amupdatedl.microsoft.com/192.168.1.109
server=/amupdatedl2.microsoft.com/192.168.1.109
server=/amupdatedl3.microsoft.com/192.168.1.109
server=/amupdatedl4.microsoft.com/192.168.1.109
server=/amupdatedl5.microsoft.com/192.168.1.109
Keep in mind that, even though we tell dnsmasq to only forward windowsupdate.com, dnsmasq will forward ALL subdomains. This is how dnsmasq works.
You need to replace the IP address above with the IP address of the host that Lancache runs on. In our case, we put this in our env file

Put the config into Pihole
I am using Pihole 5, not 6, as 6 is still in beta. The second link I provided above talks more about achieving the below, but in Pihole 6. I will stick to Pihole 5 for now.
SSH into your Pihole host, then cd to dnsmasq
cd /etc/dnsmasq.dThen we need to create a new config file
nano 02-Cache.confAnd then we paste that dnsmasq config into this file. Then our file will look like this when we cat it:

Now we need to restart pihole so it can pull in this new config (you can also restart your entire Pihole system if you want to)
pihole restartdnsSo what is actually happening?
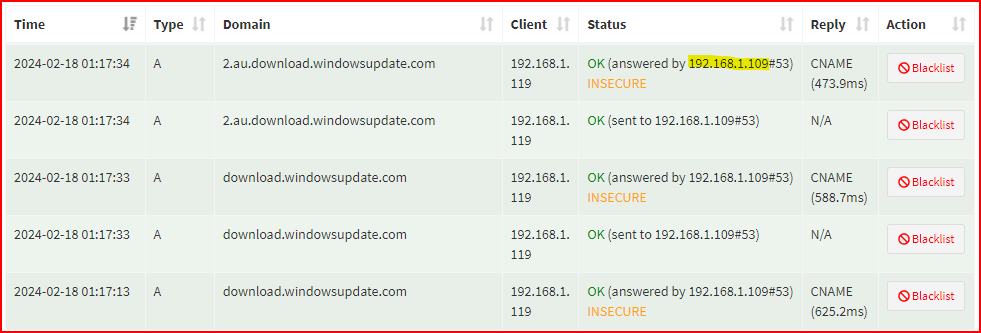
We bascially told Pihole that for any domain in our 02-Cache.conf file, that it must forward that domain to 192.168.1.109.
Remember that 192.168.1.109 is running the Lancache DNS server. So that Lancache DNS server will now get the request for, for example, windowsupdate.com, and then forward it to 1.1.1.1. Here is a reminder of where 1.1.1.1 comes from.
This way Lancache knows about all this windowsupdate.com traffic and it can do its thing, which is check if something we need is in cache, and if it is, respond from cache; and if it is not in cache, fetch it from the internet, then store it in cache.
We can also see that our Pihole is passing on DNS requests for any of the domains in our dnsmasq config file, to our Lancache IP address:
Checking if Windows Updates are actually caching
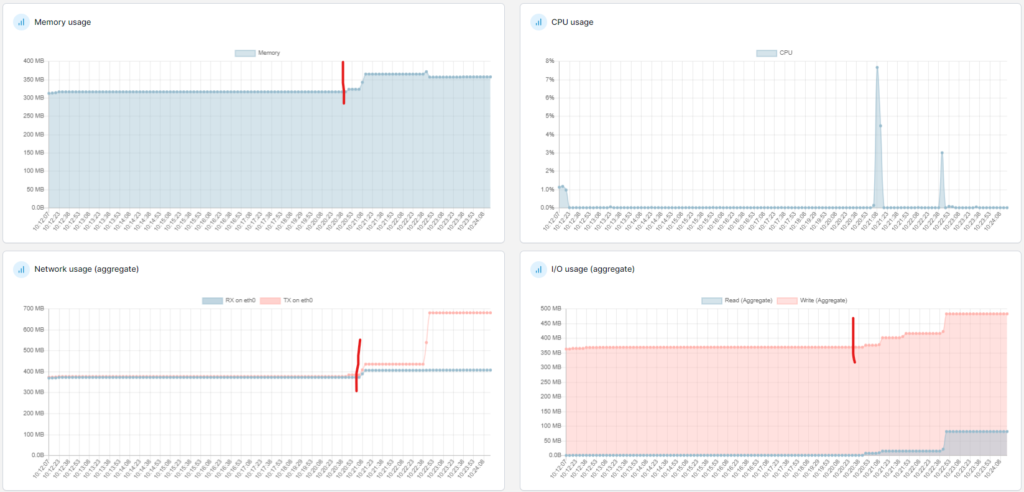
In my env file I said that cache should be stored in /opt/lancache/ This will be stored on your host. So now if I check that folder, I can see that folders are being created in this folder and the size is growing

And here we can see items are added

So I downloaded an update on my PC, and then later on my laptop. In Portainer I could see that when downloading the same update from my laptop that Lancache saw increased traffic (everything to the right of the red line)