You can run Ansible in a VM, a laptop with Linux installed, an LXC container, etc. In this tutorial we will cover the following:
- Configuring the Ansible controller by creating 2 inventory files.
- Creating a couple of playbooks. One that pings the hosts and another one that connects to all hosts, installs updates, and reboots the host if required.
- We will also connect to some hosts using a password and to others using certificates.
- We will create an Ansible vault and store our passwords there.
Authentication
For every host I want Ansible to be able to connect to, I created a user called “ansible_host” and used the same password for all of them. I did this ONLY for my internal home lab hosts. For external hosts I used certificate authentication.
It is highly recommended to use certificate authentication and not password authentication, but for this tutorial I wanted to showcase both methods.
To create the ansible user on your hosts you can run the following
adduser ansible_host
#Now enter the password for the user

#Make sure this user got created
cat /etc/passwd | grep ansible_host

#Add this user to the sudo group
usermod -aG sudo ansible_host

#Double check this user is in that group
groups ansible_host
Certificate authentication
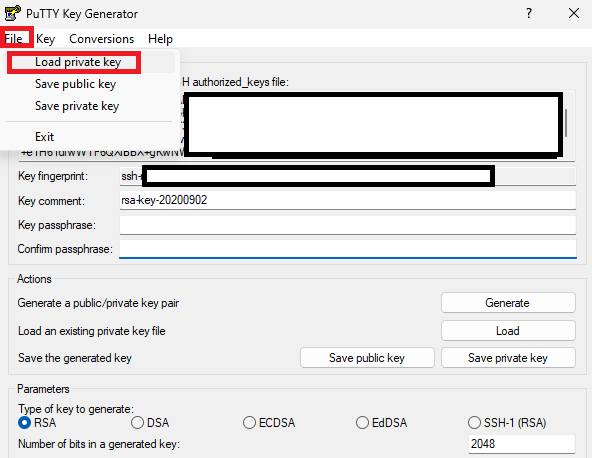
My certificates were in ppk format (pytty format), but we need them in pem format. For this you can use puttygen. I used the Windows version to convert them and to remove the private key passphrase.
Open puttygen and click on file then “load private key”
Next, make sure there is no passphrase. Then click on “Conversions” and then on “OpenSSH Key”
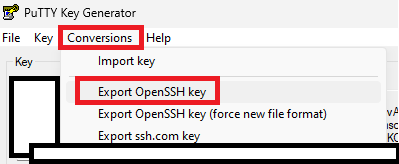
Save the key with a .pem extension. You can open this file in notepad or notepad++. We will copy this key onto our Ansible controller later on.
Prerequisites
Lets install the required Linux packages and add the Ansible repository. I had to also install “software-properties-common” because the LXC container does not have it installed by default.
sudo apt install software-properties-common
sudo apt-add-repository ppa:ansible/ansible
sudo apt update
sudo apt install ansible
Disable Known Hosts checking in Ansible
You might not want to do this, but I do. So lets disable known hosts checking in Ansible:
sudo nano /etc/ansible/ansible.cfgThen add this line to the end of the config file
[defaults]
host_key_checking = False
Ansible Vault for our Secrets
cd into /etc/ansible
We don’t want to store secrets in our config file, so lets create an Ansible Vault where this can be stored securely.
sudo ansible-vault create secrets.yml
Make sure you remember this password as it is needed to get into your vault.
Your default code editor will be opened, most likely vi. Add your secrets in here. I added the following (<PASSWORD_HERE> must be your actual password):
ansible_ssh_pass: <PASSWORD_HERE>
ansible_become_pass: <PASSWORD_HERE>

ansible_ssh_pass: This is the password that Ansible will use when connecting to your hosts. Remember I created a user called "ansible_host" on all my VMs? This is the password for that user.
ansible_become_pass: This is the password that Ansible will use when it needs to become root (sudo). If your user is part of the sudo group, the password will be the same. So we use the same password in both places. (more on “become” later when we get to our playbooks)
How do I edit my vault?
Just run this command:
sudo ansible-vault edit secrets.yml
Ansible folders
Lets create some folders so that we can organize our playbooks, inventory files, and certificates:
cd /etc/ansible
sudo mkdir inventory
sudo mkdir playbooks
sudo mkdir private_keys
Ansible has really good documentation about how to structure folders for larger deployments, so definitely give it a read; but this will do for now.
Ansible inventory files
Keep in mind that we will run Ansible from “/etc/ansible“
Basic inventory file
Your hosts can be grouped into inventory files either as single hosts or as groups of hosts. I chose groups of hosts. This is what my inventory files looks like for all my homelab LXC containers and VMs.
Call this file “local_inventory.ini” and create it in /etc/ansible/inventory
[lxc_containers]
ububtu_testing ansible_host=192.168.1.112
ubuntu_pihole ansible_host=192.168.1.114
ubuntu_ansible ansible_host=192.168.1.118

[virtual_machines]
ububtu_wazuh ansible_host=192.168.1.115
ububtu_docker ansible_host=192.168.1.109

[all:vars]
ansible_python_interpreter=/usr/bin/python3
ansible_user=ansible_host
ububtu_testing ansible_host=<ip_address>: Here we are giving our IP Address an alias so that we can refer to it using an alias in Ansible. The alias in this case is “ububtu_testing“. Using an alias makes a lot more sense than using just the IP address. ansible_host=<ip_address> just tells Ansible “this is the IP address for that alias”
[lxc_containers] and [virtual_machines]: This is a grouping. So if we reference lxc_containers in our playbook, all of these hosts will be affected. Same goes for [virtual_machines]
[all:vars]: This means that for all hosts in this file, these defaults will be used.
ansible_python_interpreter: Ansible uses python extensively under the hood, so here we’re telling Ansible “use python 3 which can be found at /usr/bin/”
ansible_user: Remember we created a user called “ansible_host” on all our hosts, and then we added the password for this user to our Ansible vault? So this is where we tell Ansible “use this username when connecting to any of these hosts in this inventory file”
More advanced inventory file using private keys
cd into /etc/ansible/private_keys
Create a file here called e.g. “my_private_key.pem” by running the following command:
sudo nano /etc/ansible/private_keys/my_private_key.pem"Now open your .pem file you exported from puttygen in notepad or notepad++, and copy and paste the contents into your nano window.
The permissions for this private key must be 400, so run this command to do that. If you do not do this Ansible will complain that this file has too high permissions.
sudo chmod 400 my_private_key.pemNow lets create that inventory file:
[oracle_virtual_machines]
oracle_132_wordpress ansible_host=132.x.x.x ansible_ssh_private_key_file=private_keys/private_132.pem
oracle_140_other ansible_host=140.x.x.x ansible_ssh_private_key_file=private_keys/private_140.pem

[all:vars]
#ansible_python_interpreter=/usr/bin/python3
ansible_user=ubuntu
Again, were using a grouping called [oracle_virtual_machines] but we added an extra bit of config so lets break it down a bit:
oracle_132_wordpress ansible_host=132.x.x.x ansible_ssh_private_key_file=private_keys/private_132.pem
- oracle_132_wordpress is our alias
- ansible_host=132.x.x.x is where we tell Ansible “hey, this is the IP address for this alias”
- ansible_ssh_private_key_file=private_keys/private_132.pem Here we tell Ansible that we want to connect to this VM using a private key, and that private key can be found in the folder private_keys/private_132.pem
- We have 2 hosts in this file so you can see that for each host you can specify its own private key
- [all:vars] remains the same as for our basic inventory file, except that we are now connecting using a different user
Ansible Playbook
cd into “/etc/ansible/playbooks” and run sudo nano play_ping.yaml
A playbook (yaml file) can consist of 1 or more plays, and each play can consist of 1 or more tasks.
Lets create a playbook with 1 play and 2 tasks that will just ping our hosts. This is a good way to test connectivity
- name: My first play
  hosts: lxc_containers:oracle_virtual_machines
  become: yes
  vars_files:
    - ../secrets.yml
  tasks:
   - name: Ping my hosts
     ansible.builtin.ping:

   - name: Print message
     ansible.builtin.debug:
       msg: Hello world
name: Can be any descriptive name for your play.
hosts: We tell this playbook that it can be run for both these host groups lxc_containers:oracle_virtual_machines.
become: We tell Ansible that it must become root
vars_files: This is where we tell Ansible where it can find our Vault with our passwords. Remember that our secrets.yaml file is in /etc/ansible/ and our playbook is in /etc/ansible/playbooks/ So “../” means “go back 1 folder” which puts us back into /etc/ansible where our secrets.yaml file is.
tasks: The name of our task and what each task does.
Running a playbook
cd into /etc/ansible/ and run this command
sudo ansible-playbook -i inventory/inventory_local.ini playbooks/play_ping.yaml --ask-vault-pass- -i: Tells Ansible where to find our inventory file
- Then we pass it our playbook file we want to run
- –ask-vault-pass tells Ansible to ask us for our Vault password so that it can get our user and become root
But, what if we dont want Ansible to always ask for our Vault password? What if we want Ansible to get it from somewhere and run the playbook without any intervention?
Running a playbook without having to provide a password
In /etc/ansible create a file called “vault_password_file” or the like. Then change its permissions:
sudo chmod 400 vault_password_filePut your vault password file into this file by sudo nano vault_password_file and pasting your vault password.
Now run this command:
sudo ansible-playbook -i inventory/inventory_oracle.ini playbooks/play_ping.yaml --vault-password-file vault_password_file–vault-password-file vault_password_file: Here we tell Ansible that it must get the vault password from a file, and that file can be found in “vault_password_file”
Now when you run this playbook, you will get the following output:
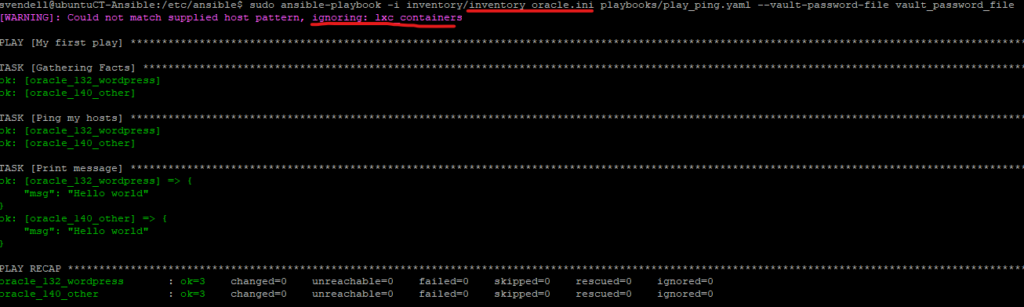
You see that it says “ignoring lxc_containers”? That is fine, because in our playbook we gave it the following option for hosts:
hosts: lxc_containers:oracle_virtual_machinesBut in the inventory file we are passing through “inventory_oracle.ini” [lxc_containers] does not exist. So no need to worry when you see this, Ansible is smart enough to know what hosts or host groups exist in the inventory file you are passing through.
A practical playbook – Updating pihole
- name: Update pihole
  hosts: ubuntu_pihole
  become: yes
  vars_files:
    - ../secrets.yml
  tasks:
   - name: Update pihole
ansible.builtin.command: pihole -uphosts: Here we provide our playbook with only a single host. This host is part of the [lax_containers] grouping
become: We become root
tasks: We tell Ansible to run a command on the host, in this instance “pihole -up” so that we can update pihole
A more advanved playbook – apt update, apt upgrade, and reboot when needed
I wanted a playbook that I could run to basically do:
- apt update
- apt upgrade
- check if the host must be restarted and restart it if needed
- run a test command once the host has been restarted to make sure it is back up
A lot of credit goes to this guy, he has an amazing post on this specific playbook: https://www.cyberciti.biz/faq/ansible-apt-update-all-packages-on-ubuntu-debian-linux/
- name: Keep things updated
  hosts: lxc_containers:virtual_machines:oracle_virtual_machines
  become: yes
  vars_files:
    - ../secrets.yml
  tasks:
   - name: apt update
     ansible.builtin.apt:
       update_cache: yes
       cache_valid_time: 3600
   - name: apt upgrade
     ansible.builtin.apt:
       name: "*"
       state: latest
   - name: Check if a reboot is needed on all servers
     register: reboot_required_file
     stat: path=/var/run/reboot-required
   - name: Reboot the box if reboot file above exists
     ansible.builtin.reboot:
       msg: "Reboot initiated by Ansible because reboot file existed"
       connect_timeout: 5
       reboot_timeout: 500
       pre_reboot_delay: 25
       post_reboot_delay: 30
       test_command: uptime
     when: reboot_required_file.stat.exists
Schedule an Ansible playbook using crontab
We need to run the commands using sudo’s crontab
sudo crontab -e0 23 * * 2 2 cd /etc/ansible/ && ansible-playbook -i inventory/inventory_local.ini playbooks/play_update_pihole.yaml --vault-password-file vault_password_file
0 23 * * 3 cd /etc/ansible/ && ansible-playbook -i inventory/inventory_oracle.ini playbooks/play_update_upgrade.yaml --vault-password-file vault_password_file
0 23 * * 5 cd /etc/ansible/ && ansible-playbook -i inventory/inventory_local.ini playbooks/play_update_upgrade.yaml --vault-password-file vault_password_file(We first need to cd into “cd /etc/ansible/” so Ansible knows where to find all our file)
Export Ansible logs to a file
By default Ansible will display logs on STDOUT which your terminal. We can also tell Ansible to log to a file by adding this config to /etc/ansible/ansible.cfg
[defaults]
host_key_checking = False
log_path = /var/log/ansible.log
log_path: Tells Ansible where to store the logs on disk. The exact same output that you get on your terminal (STDOUT) will be in this log file. Just make sure no sensitive information such as usernames and passwords are in your logs file.